Are you an artist or a publisher looking to bring your art to life through a book? Art book printing can be overwhelming, especially if you're new to the game. But fear not! We've got you covered with all the information you need to make informed decisions about printing your art book.
On this page, we'll explore inspiration for your project, cost factors in printing, binding options, paper choices and size options. We will also take a deeper dive into each of these areas so that you can make an informed decision that suits your specific needs. We believe in embracing your ideas and taking a flexible approach while staying within physical and monetary parameters.
We want to help bring your vision to life! So why wait? Let's get started on bringing your art book dreams to reality today!
Setting Up Your Artwork For Print
Jump straight to>>>


⬇️ Or scroll down to read each guide, for a complete overview
Wire Stitching Guide
Perfect Binding Guide
Hardback
Book Guides
Adding 3mm Bleed
Video Guides
File Set-Up Checklist
A key thing to remember is, all we need to print your book is a PDF file. Our guides discuss preparing artwork in Adobe Indesign, but you can choose any computer program for the design then Save As or Export to PDF.
File Set-Up Checklist
Before you send your file to us for printing, pause for a second and read through these 6 key requirements.
⚠️ Ensure 3mm bleed and crop marks are added to all four edges of your pages.
⚠️ Double-check that your artwork dimensions match your desired print size.
⚠️ The number of pages in your artwork should correspond to the total in your final booklet.
⬇️ Or continuing scrolling for more help on preparing artwork correctly.
⚠️ Position important elements and page numbers at least 5mm away from the page margins.
⚠️ Confirm your images are high resolution (300dpi) and, ideally, in CMYK format rather than RGB.
⚠️ Save all files as PDFX/1A during export, which you can select from the top menu in the PDF export options.
Did you get 6 ticks on our check list?
Great, lets get your work into print!
Adding Bleed on Your Artwork
Unlock the secrets of perfect print design with our comprehensive video. In 8 minutes, you will learn how to add 3mm bleed on your pages and export artwork to PDF.
If you prefer to work from illustrated guides, we have those too!


Design for Print Video Guides
Our dynamic collection of videos is your fast track from print novice to expert. The videos cover everything from design basics to Adobe InDesign mastery for print.
Wire Stitched Artist Book Set-Up
Follow these simple steps to creating a print-ready file for printing a stapled booklet with us.
Wire Stitching Checklist
⚠️ We need one hi-res pdf with a 3mm bleed on each edge and CMYK images.
⚠️ Pages should be supplied incorrect reading order: 1st page is your cover, 2nd page the inside cover etc right through to your back cover.
⚠️ Your total number of pages must be a multiple of 4 (8,12,16,20,24,28 etc).
⚠️ The artwork should be the same size you want your printed booklet to be.
⚠️ Pages nearer the centre of the booklet are trimmed shorter (this is called creep) – keep important page numbers and info away from edges.
Setting up artwork for a Wire Stitched Booklet
To prepare your wire-stitched book files, start by arranging them in the correct reading order. The cover should be the first page, followed by the inner pages in the order they will be read, and the back cover as the last page. Remember, you need to supply these as single pages, not as spreads. Our system will handle the imposition, arranging the pages into printer's pairs, so your main focus should be on the sequential order of the pages.
Begin by creating a new document
Go to File > New > Document.
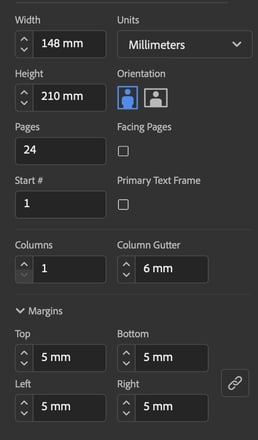
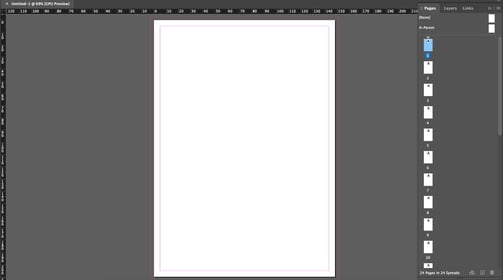
Next up, you will see the dialog box shown here. Within this box are the settings you need to define based on the size and number of pages of your booklet.
The example shown here is for a 24 Page A5 Booklet
Page Size in Width and Height: Set this to the size of your finished zine. Ensure it matches your intended trimmed size.
A5 is 210x148mm, A4 is 297x210mm or choose any bespoke choice - we can print them all.Orientation: Choose between portrait (left-hand icon) and landscape (right-hand icon).
Pages: Enter the total number of pages. It must be a multiple of four for wire stitching, like 8, 12, 16, 20, 24, etc.
Facing Pages: If designing in double-page spreads is more comfortable, leave this option checked. Otherwise, uncheck it. Experiment with both methods to see which suits you best.
Master Text Frame: Keep this option unchecked.
Columns: Generally, leave this set to '1', unless you're aiming for a specific column layout.
Column Gutter: This is the space between columns. If you have only one column, skip this setting.
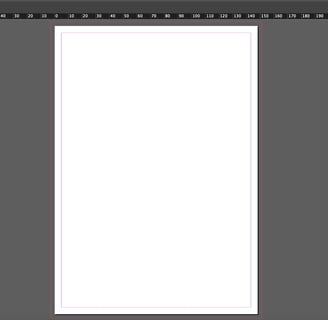
Margins: It is good practice to set all margins to 5mm which encourages you to keep crucial content away from the page edges. These margins appear as pink lines in InDesign (shown here). If this is confusing, set the margins to '0'.
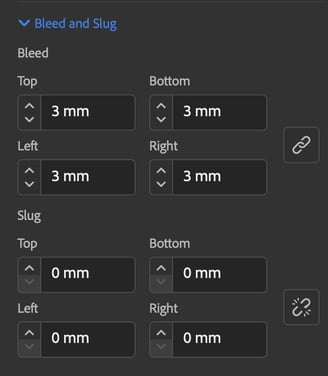
Bleed: Enter 3mm in each box to extend the bleed area by 3mm beyond the page edge, indicated by a red border in InDesign.
Slug: These boxes can all be left on '0'.
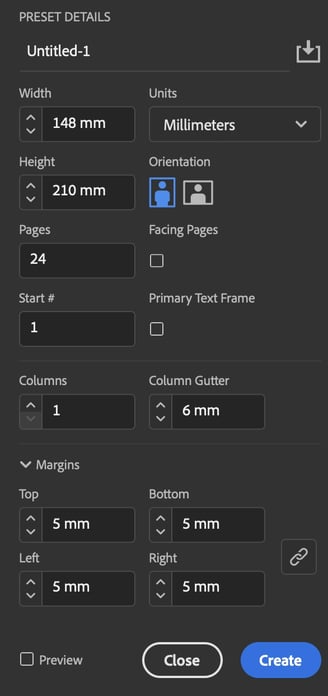
After setting these parameters, click 'CREATE' to open your new file. The new page should look like our example here. The pages tab down the right hand side, lets you jump to any of the 24 pages.
Now, continue refining your design by following our File Set-Up and Binding Options guidelines. Once satisfied, export your artwork to PDF. It is best to use a service like wetransfer.com to send us the final PDF.

Winning Solutions for Designing and Styling a Wire Stitched Booklet
Enjoy our short video about winning solutions for designing and styling your wire stitched project.
Perfect Binding Book Set-Up
Crafting the Perfect Bound Book: A Step-by-Step Guide to Preparing Your Artwork
Perfect Binding Checklist
⚠️ We need two files - a spread for the inside and outside cover AND a second file for the text pages.
⚠️ The text file should be single pages NOT spreads.
⚠️ Cover spread needs the correct spine size through the centre of the cover file.
⚠️ Artwork should be the same size you want your printed book to be.
⚠️ You lose 2-3mm in the spine gutter on each double-page spread. Keep content clear of this area especially text.
⚠️ There is a hinge on the 1st and last inside page where the cover is glued on. This 7mm area is completely hidden so keep any content well away from it.
⚠️ When you're happy with the design, export to High Res PDF with crop marks and 3mm bleed on each edge. Ideally choose PDFX1/a:2001 in InDesign.
Embarking on your perfect bound book printing journey is straightforward and exciting. You'll only need two high-quality PDFs to get started. With the widespread availability of 'Export to PDF' or 'Save As PDF' options in 2023's layout programs, your main focus can be on the creative aspects of your design.
For the Cover Spreads, we require a single PDF file consisting of two pages:
• Page 1 features the outer cover spread, with the back cover on the left, the spine at the center, and the front cover on the right.
• Page 2 showcases the inner cover spread, with the inside front cover on the left and the inside back cover on the right. The spine remains blank in the middle, as this is where we'll bind the pages.
The spine's width is determined by the number of pages inside your book – more pages mean a thicker spine.
For the Inside Pages, we need a second PDF, which contains all the inner pages in the correct reading order.
The first page in this file becomes the first right-hand page of your book. So if your book contains 60 inside pages, your PDF should have 60 pages as well. The running order of your book is:
• Front Cover (in the outer cover spread PDF)
• Inside Front Cover (in the inner cover spread PDF)
• First Right Hand Page (page 1 in your inside pages PDF)
• Pages 2 and 3 of your inside pages PDF, forming a double-page spread.
If your book's inside pages are designed in spreads, remember to export them as individual pages. Adobe InDesign, for example, allows you to do this with a single click (see screenshot here).
A crucial detail to remember is the 3mm bleed on each page. If you're unsure about what 'bleed' means, we recommend watching our informative video. It's essential viewing before submitting your files.
When exporting, choose the PDFx1a:2001 setting if it's available. If not, select the 'Highest Quality' or 'Maximum Quality' option available.
By following these simple steps, your artwork will be primed and ready for printing – it's as easy as that! ✅✅✅✅✅

Video Guide for Preparing a Perfect Bound Book Cover
Enjoy our short video about winning solutions for designing and styling your wire stitched project.
Hardback Book Set-Up Guides
Crafting the Perfect Bound Book: A Step-by-Step Guide to Preparing Your Artwork
Hardback Binding Checklist
To produce your hardback book, we require high-quality PDF files. The number of files needed depends on whether your end-papers are printed or blank:
• If your end-papers are printed, please provide 4 files.
• It is 2 files if your end-papers are unprinted and blank.
Most design programs offer the option to Export to PDF or Save As PDF, making the process straightforward and requiring only a few clicks once you've completed your layouts.
Here is a breakdown of each artwork file
File 1: Outer Cover
The outer cover file should be a flat spread based on our hardback cover guide, which you can download here. It includes a spine running through the centre, the size of which depends on the number of pages in your book. The minimum size spine for 28 to 40 pages will be 9mm.
The cover file for a hardback book is a bit more complex because it must account for the sections folded around the spine and the extra flaps that tuck around the hardback case.
In our guide, the green areas represent the flat panels of the book cover and spine and should contain your primary cover artwork. The purple areas will be on the indents or partially hidden sections when the cover is glued on, so avoid placing critical information in them. These purple areas work best as a continuation of your background color or image, as they are partially visible. You can watch this video guide for a clearer explanation on how we make hardback books.
After downloading the cover guide, you'll need to do some simple calculations.
The cover artwork width is as follows: Width = 17mm + width of your book + 5mm + spine size + 5mm + width of your book + 17mm
The height is calculated as: Height = 17mm + 3mm + height of your book + 3mm + 17mm
For example, if your hardback book is A5 (210x148mm) with 40 inside pages on 130gsm Silk paper (9mm spine), the cover dimensions would be: Width = 17+14+5+9+5+148+17 = 349mm Height = 17+3+210+3+17 = 250mm
So, create a new page in InDesign with dimensions 349x250mm. Set the margins at 17mm on each side for a clear view of the flaps. You can also use the "Columns" feature with a 9mm gutter to create vertical guides for the spine.
File 2: Front Endpapers
If you want the endpapers printed, you can supply a pattern or solid color for them. The front endpapers should be a two-page file with two double-page spreads, twice the width of your text pages. Page 1 is the reverse of the endpaper, so keep the right-hand half blank, as it's glued to the inside cover. Page 2 is the first spread when you open the book's cover. You can follow this template guide for sizing adjustments.
For example, if your book is A5 (210x148mm), the endpaper spreads should be 210x296mm. For A4 (297x210mm) books, the endpaper spread should be 297x420mm.
File 3: Back Endpapers
Similar to the front endpapers, the back endpapers should be a two-page file with two double-page spreads. Page 1 is the reverse of the endpaper, so keep the left-hand half blank, as it's glued to the inside back cover. Page 2 is the last spread before you close the book's back cover. You can download the guide for further details.
File 4: Inside Text Pages
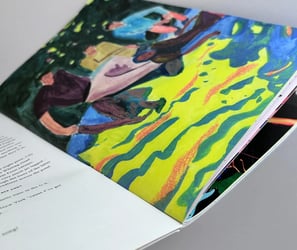
This file contains your main book content, including text, images, graphics, and illustrations. It's supplied as single pages in reading order. You can explore various page layout ideas in our video guide, which works well for children's books, photography books, and high-end coffee table books.
All files should include crop marks and have a 3mm bleed. When exporting from InDesign to PDF, choose PDFX/1A from the top drop-down menu. Starting with bleed from the beginning saves time.

The Page Order of Hardback Books
The running order of hardback book pages is as follows:
> Front Cover
> Front Endpaper (glued to inside front cover)
> Front Endpaper
> Back Endpaper (glued to inside back cover)
> Right Hand Inside Text Page
> Double Page Spreads ...
At the end of the book:
> Double Page Spread
> Last Left Hand Inside Page (last page of your text)
> Front Endpaper (right side)
> Back Endpaper (glued to inside back cover)
> Back Cover
If you have any questions, feel free to reach out to us via email, phone, or live chat. We're here to assist you.
Jump To Pages
Social Media
artistbookprinting.com is the dedicated mini site for Artist Book Printing from the creative printer Ex Why Zed.
Visit our full site at exwhyzed.com
Unit 212
37 Queen Street
Colchester
Essex
CO1 2PQ
01206 766647
hello@artistbookprinting.com
Find Us At
Copyright 2024. Site Designed and Written By Ex Why Zed.